Forum Machete,Modelism,Hobby: Ki-84 Hayate (Frank) - Forum Machete,Modelism,Hobby

Salt la continut

  • 2 Pagini +
  • 1
  • 2
  • Nu puteti crea un topic nou
  • Nu puteti replica pe acest topic

Ki-84 Hayate (Frank)

#21 Useril este offline   curec_christian 

  • Membru senior
  • Grup: Members
  • Postari: 606
  • Inregistrat: 13-December 04

Postat 17 August 2005 - 08:51 AM

Salut,

Group build-ul s-a terminat si eu nu am reusit sa termin decit cockpit-ul. :hammer:
Era de asteptat.
Oricum pina acum am avut parte de o adevarata saga si proiectul asta se lupta cu mine in fel si chip. O sa fie gata atunci cind are el chef si nu cind o sa imi planific eu.

Pentru eventuale clarificari sau intrebari va stau cu placere la dispozitie.

Christian

Thumbnail atasat

  • Imagine atasata: P1030098_copie.jpg


#22 Useril este offline   curec_christian 

  • Membru senior
  • Grup: Members
  • Postari: 606
  • Inregistrat: 13-December 04

Postat 17 August 2005 - 08:52 AM

pic 2

Thumbnail atasat

  • Imagine atasata: P1030089.JPG


#23 Useril este offline   curec_christian 

  • Membru senior
  • Grup: Members
  • Postari: 606
  • Inregistrat: 13-December 04

Postat 17 August 2005 - 08:55 AM

pic 3

Thumbnail atasat

  • Imagine atasata: P1030082.JPG


#24 Useril este offline   curec_christian 

  • Membru senior
  • Grup: Members
  • Postari: 606
  • Inregistrat: 13-December 04

Postat 17 August 2005 - 08:59 AM

Datorita lipsei de timp (nu am momentan timp sa traduc comentariile facut pt. group build in limba romana) o sa anexez textul in limba engleza.
Sper sa nu ofensez pe nimeni.

"Isamu Sasaki’s Ki-84

The skeleton is pain in the … Gluing all the parts together is very difficult but the worst thing is when you discover that on one crossing a part is not in it’s place. You can not detach the part because the part will be broken and whole structure will be bend, which will generate another set of problems when you are trying to glue the rest of the components.
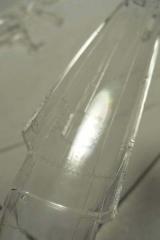
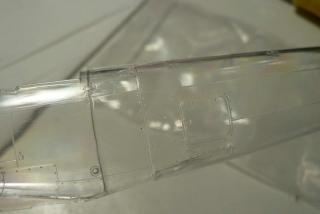
Anyway, after gluing (with a cianoacrylate glue) all the parts I have discovered that the structure is too big to enter the fuselage.
Sanding seemed the right way so I used a Dremel machine at low speed. It worked fine until head got stocked on a rib and broke several elements. After gluing the parts I have sanded the piece by hand but still broke some parts several times until it was small enough to enter the fuselage.
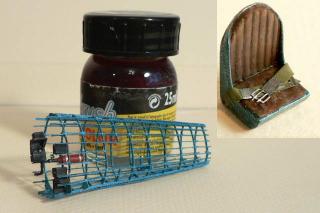
The oxygen tube has scratchbuild from a sprue, gauge made from a decal paper. I have decided in the last moment to add the oxygen tube because it will add a colour spot in a place where noting will draw the eye.
Furthermore I have added wires and pipelines from copper wires.

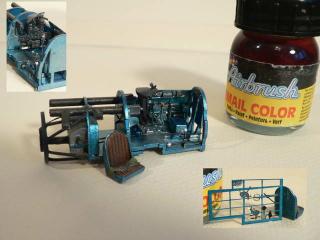
Inside the cockpit I used a Eduard zoom set (partially) only where I thought that the photoetched parts are looking better than the original. I must say that Hasegawa has done a beautiful job on this cockpit.
Unfortunately this plane has two radio stations!!!
The original (Japanese) radio station was installed between the legs of the pilot under gauges. After the war, the only remaining plane of this type, was fitted with an American radio station on the right side of the cockpit. Hasegawa chose to mould the model with this radio station and not with the original one.
Normally I had to erase the American radio station but I thought that I will add more interest to the cockpit in a area visible through side and also through cockpit.
I added levers, wires and cables (from the pedals to the aft part of the fuselage).
A set of wires and cables is going from the gauges through the fire wall and reaches the engine.

My favourite is the small lever installed on the right side of the aiming device who is catching my eye all the time.

The seat was scratched with a needle, then putty was used in order to give some dimension to the leather cushion. This was followed by different layers of paint. Base paint – enamel – leather, dark wash – oil paint – terra ombra bruciatta, drybrush – enamel – leather + 15% light gray, drybrush – enamel – light gray with a drop of green and finaly I have coated everything with a transparent matt to obtain a finish similar to leather.
I used the seat belts from Eduard – painted and drybrushed (iron – aluminium, green – gray) which seemed to be the most appropriate colours to the real ones. Transparent matt was used again for the finish of the textile.

The whole cockpit was painted, washed (with different colours), drybrushed and then drybrushed again with different shades of colours, in order to add depth and the look of a used thing.
Aotake colour from inside the cockpit was drybrushed with aluminium.
The left side of the cockpit made only from a photoetched part was also transformed with the use of the Eduard set. A lever for opening the canopy and a wheel was replaced with new (more detailed) parts.
After painting all the parts I have realised that the two tubes that are covering the machineguns are too small and the place between the engine and the cockpit is not accurately design by Hasegawa so I had to scratchbuild the tubes and a floor that was enabling me to fix all the parts together (cockpit, oil tank, fire wall …).
Tubes were painted in black and drybrushed with rust.

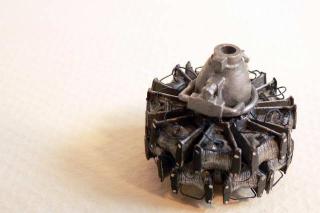
The engine was painted in iron, washed with blue (aquarela paints) then drybrushed with aluminium. Finally electrical cables were added with help of thin copper wire. I painted the wires in dark blue in order to give some colour to this area.

I hope you like it. For me it is the best cockpit I have made until now. "

Christian

Thumbnail atasat

  • Imagine atasata: P1030069.JPG


#25 Useril este offline   Z-mare 

  • Membru senior
  • Grup: Moderator
  • Postari: 12676
  • Inregistrat: 07-December 04
  • Location:Sebes -Alba

Postat 17 August 2005 - 08:54 PM

Ce-am vazut arata migala si rabdare! Felicitari. Banuiesc ca asta ar cam fi cauza intirzierii :-D
Pacat de text....

#26 Useril este offline   curec_christian 

  • Membru senior
  • Grup: Members
  • Postari: 606
  • Inregistrat: 13-December 04

Postat 26 August 2005 - 10:24 AM

Salut,

Am ajuns la cea mai grea etapa a modelului (Ki-84 Sketeton edition) si sincer sa fiu inima mi s-a facut cit un purice pentru ca riscam sa pierd tot ceea ce am facut pina acum.

Cind am verificat piesele din cutie am observat ca pe cele doua elemente de plastic transparent ce formeaza fuselajul exista niste urme de injectie, destul de vizibile (mari si de urite) cit sa deterioreze tot aspectul modelului. Mai mult plasticul nu era perfect transparent (cred ca se vede in primele doua fotografii) avind aspectul unei sticle aburite.
Treaba era complicata si datorita faptului ca urmele de injectie erau plasate pe interiorul fuselajului avind forma unor adincituri in plastic.

Existau doua solutii :
1. Sa incerc sa radau transparenta plasticului si sa elimin urmele de injectie;
2. Sa decupez plasticul si sa las niste ferestre in care sa se vada interiorul.

Am decis sa incerc sa le elimin si am apelat la ajutorul unui prieten care este oftalmolog (confectioneaza si ochelari) si care mi-a recomandat pasta abraziva si pisla - pasta fiind cea pe care el o foloseste in confectionarea ochelarilor cu lentile de plastic.

Am luat freza, am montat un disc de pisla si am trecut incet la polisharea celor doua parti ale fuselajului.
Bineinteles, cu toate ca am redus din viteza frezei, dupa nici un minut am reusit sa deteriorez, prin topire suprafata plasticului.
Cu o bucata de hirtie abraziva fina, am riscat si am eliminat toate urmele de injectie, inclusiv zona matiuita prin topire.
Apoi cu un pic de pasta si multa rabdare (am dat freza la viteza maxima) – nu trebuie incalzit materialul am reusit sa redau transparenta intregii suprafete.

Dupa operatia de slefuire am vopsit intreaga zona (interior si exterior) cu Klir.
Sper ca efectul sa se vada in fotografii (Plasticul transparent este mai dificil de fotografiat decit credeam).

Sunt super multumit de rezultat.
Daca vre-o data aveti ocazia sa va intilniti cu niste carlinigi spatii vitrate ‘aburite’ (cupole geamuri sau ce o fii ele) nu ezitati sa folositi metoda de mai sus.

Christian
Bafta la modelit.

Thumbnail atasat

  • Imagine atasata: P1030119.JPG


#27 Useril este offline   curec_christian 

  • Membru senior
  • Grup: Members
  • Postari: 606
  • Inregistrat: 13-December 04

Postat 26 August 2005 - 10:25 AM

pic 2

Thumbnail atasat

  • Imagine atasata: P1030120.JPG


#28 Useril este offline   curec_christian 

  • Membru senior
  • Grup: Members
  • Postari: 606
  • Inregistrat: 13-December 04

Postat 26 August 2005 - 10:26 AM

pic 3

Thumbnail atasat

  • Imagine atasata: P1030124.JPG


#29 Useril este offline   curec_christian 

  • Membru senior
  • Grup: Members
  • Postari: 606
  • Inregistrat: 13-December 04

Postat 26 August 2005 - 10:28 AM

pic 4

Thumbnail atasat

  • Imagine atasata: P1030126.JPG


#30 Useril este offline   curec_christian 

  • Membru senior
  • Grup: Members
  • Postari: 606
  • Inregistrat: 13-December 04

Postat 26 August 2005 - 10:29 AM

pic 5

Thumbnail atasat

  • Imagine atasata: P1030131.JPG


#31 Useril este offline   curec_christian 

  • Membru senior
  • Grup: Members
  • Postari: 606
  • Inregistrat: 13-December 04

Postat 26 August 2005 - 10:30 AM

pic 6

Thumbnail atasat

  • Imagine atasata: P1030133.JPG


#32 Useril este offline   curec_christian 

  • Membru senior
  • Grup: Members
  • Postari: 606
  • Inregistrat: 13-December 04

Postat 26 August 2005 - 10:32 AM

pic 7

Thumbnail atasat

  • Imagine atasata: P1030136.JPG


#33 Useril este offline   curec_christian 

  • Membru senior
  • Grup: Members
  • Postari: 606
  • Inregistrat: 13-December 04

Postat 26 August 2005 - 10:33 AM

ultima poza

Thumbnail atasat

  • Imagine atasata: P1030137.JPG


#34 Useril este offline   Z-mare 

  • Membru senior
  • Grup: Moderator
  • Postari: 12676
  • Inregistrat: 07-December 04
  • Location:Sebes -Alba

Postat 26 August 2005 - 06:44 PM

Citeaza

(am dat freza la viteza maxima)
Nu cumva e o eroare aici???

Greseala a fost la freza viteza mare si apasarea pislei pe plastic, caz in care pisla s-a incins datorita frecarii mari si a distrus plasticul.
Mai ai o metoda fara...viteza ;-) . Trebuie sa folosesti setul de trei sau patru "pile" speciale pentru ungii. Initial indepartezi "gorsul" cu hirtie abraziva de 500 - 600, apoi pilesti manual cu pila nr 1 (alb) pina la uniformizarea suprafetei, apoi treci la pila nr 2 (verzui)si in final la nr.3 (albastru), cind piesa apare deja foarte transparenta. O baie in Future desavirseste munca!

Thumbnail atasat

  • Imagine atasata: pile.jpg

Aceasta postare a fost editata de Z-mare: 26 August 2005 - 06:46 PM


Arata acest topic


  • 2 Pagini +
  • 1
  • 2
  • Nu puteti crea un topic nou
  • Nu puteti replica pe acest topic

1 useri citesc topicul
0 membri, 1 vizitatori, 0 utilizatori anonimi